MiSTer FPGA Starter Notebook: Core Setup, SD Card Flashing & Controller Latency
Original Source & Credits
- Channel: RetroRGB
- Video Title: RetroRGB - MiSTer: Getting Started
- Publication Date: April 3, 2022
- Watch on YouTube: https://www.youtube.com/watch?v=F5__shDTYMQ
TL;DR
- 3 Core Minimum Hardware: DE10-Nano FPGA board, USB keyboard for setup, and MicroSD card with internet connection.
- Automated Linux Installer: Flash Mr. Fusion Debian installer image to MicroSD card to automatically partition and configure the DE10-Nano.
update_allScript Integration: Runupdate_all.shto automatically fetch FPGA core binaries, system ROM dependencies, arcade files, and scripts over WiFi or Ethernet.- Recommended 128MB SDRAM Upgrade: Add a 128MB SDRAM module for complete compatibility with Neo Geo, Capcom CPS2/CPS3, Game Boy Advance, and Sega Saturn cores.
The MiSTer FPGA project is an open-source hardware emulation platform designed to recreate vintage gaming consoles, computers, and arcade systems with cycle-accurate precision and virtually zero input latency. Unlike software emulators running on modern operating systems, MiSTer reconfigures physical FPGA logic elements to mimic the original motherboards and custom chips at the hardware level.
This guide summarizes the minimal-budget, step-by-step setup workflow presented by RetroRGB to get up and running via HDMI output using the Mr. Fusion installer.
1. Hardware Essentials & Minimal Setup
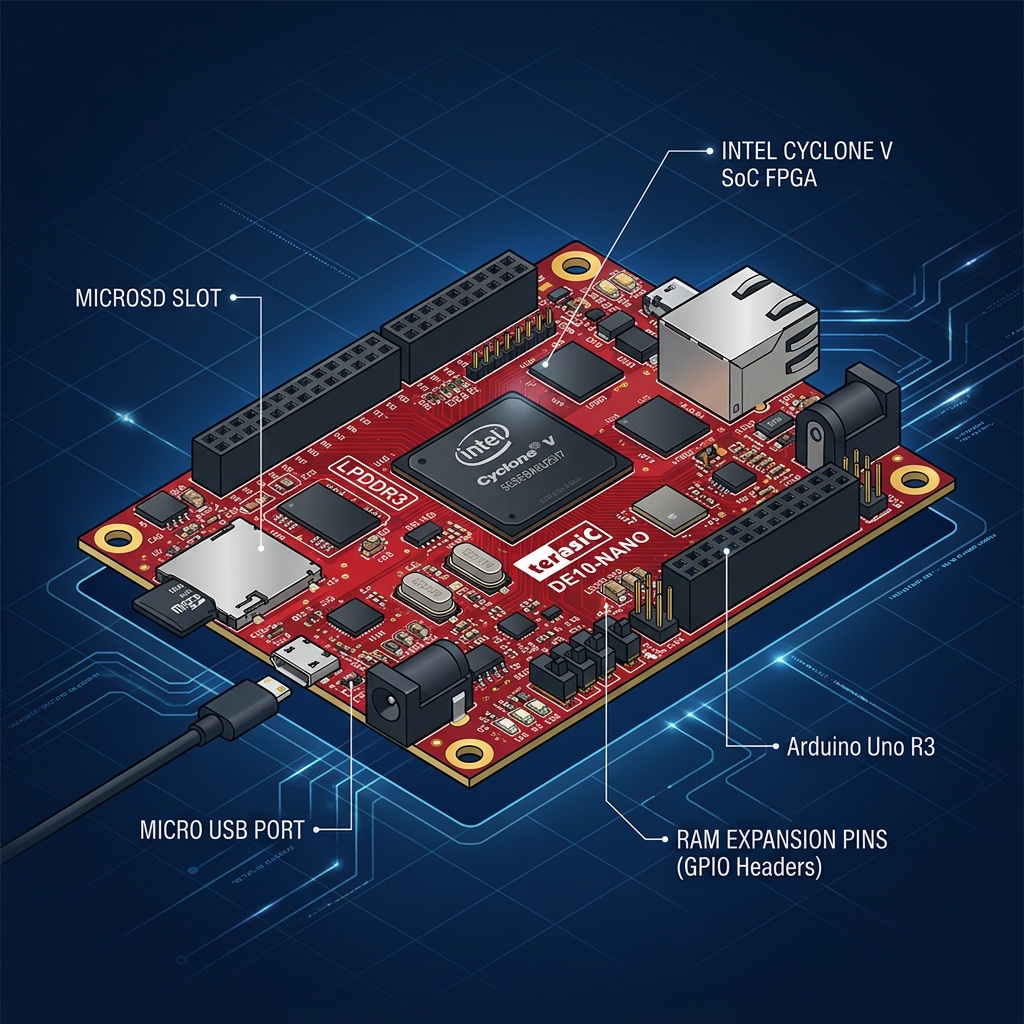
Figure 1: Minimal DE10-Nano hardware breakdown highlighting ports, power jack, and MicroSD slot.
To get started on the lowest possible budget, you only require three core items:
1. Terasic DE10-Nano FPGA Board (The central processing unit).
2. USB Keyboard (For initial setup and configuration).
3. Internet Connection (Ethernet cable or compatible USB WiFi dongle).
Required & Recommended Hardware Checklist
| Hardware Item | Status | Purpose & Recommendations |
|---|---|---|
| DE10-Nano Board | Mandatory | The core FPGA hardware (~$200 MSRP). Comes with acrylic cover, standoffs, 5V power supply, and 8GB MicroSD card. |
| RAM Module (128MB) | Highly Recommended | Essential for large systems (Neo-Geo, Capcom CPS2/CPS3, GBA, Saturn). Install with label text facing outwards. |
| Micro USB Hub | Recommended | The DE10-Nano only has one Micro-USB OTG port. A cheap passive Micro-USB hub ($10) provides multi-device access. |
| USB Keyboard | Required for Setup | Needed to navigate script menus, configure WiFi, and map controller inputs. Small handheld wireless keyboards work great. |
| MicroSD Card & Reader | Mandatory | The included 8GB card is sufficient for initial setup and smaller console libraries. Use a USB reader to flash image. |
Budget Tip: Do not buy expensive custom aluminum cases, I/O boards, or complex multi-controller setups until after your initial system is running and verified.
2. Software Setup Workflow
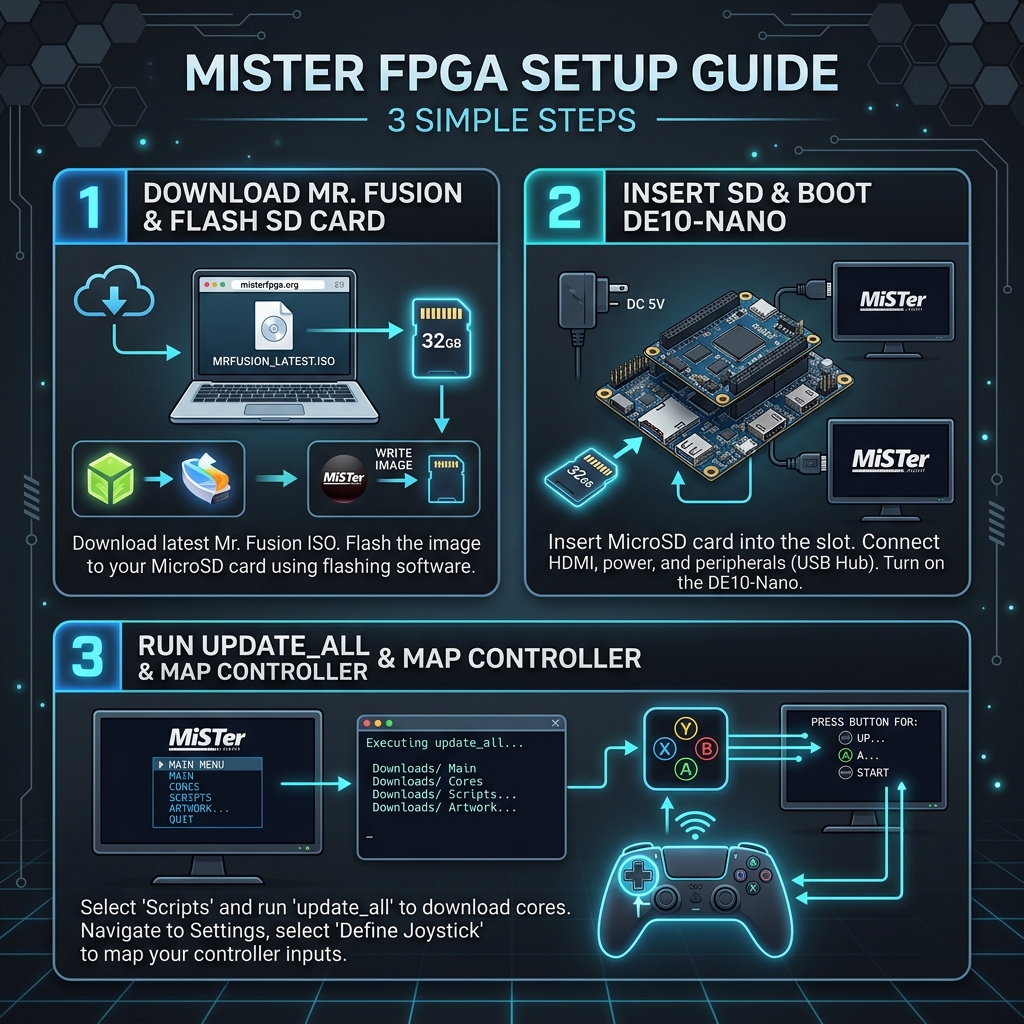
Figure 2: Automated software setup workflow from flashing Mr. Fusion to running update_all.
The setup process uses Mr. Fusion, a self-contained Debian Linux-based automated installer image.
Step-by-Step Installation Procedure
1. Flash Mr. Fusion:
- Download the latest
mr-fusion.zipfrom MiSTer-devel GitHub. - Extract the
.isofile. - Write the
.isoto your MicroSD card using tools like Win32DiskImager, Rufus, or BalenaEtcher. - Note: Ignore any Windows popup messages asking to format partitions on the card.
2. First Boot & Installation:
- Insert MicroSD card into the DE10-Nano, connect HDMI and power.
- Mr. Fusion automatically partitions the SD card and installs MiSTer.
- When finished (1–3 minutes), the screen displays a fuzzy background with
"No Files". Power off the DE10-Nano.
3. Add
update_all Script & Configuration:- Re-insert MicroSD card into your PC.
- Download the Update_All_MiSTer script and place
update_all.shinside the/Scriptsfolder on the MicroSD card. - Duplicate
mister_example.inion the root of the SD card, rename it tomister.ini, and set your target display resolution (e.g.video_mode=8for 1080p60).
3. Configuration & Daily Use
Running update_all
1. Reinsert the MicroSD into DE10-Nano, connect USB keyboard, network (Ethernet or WiFi), and power on.
2. If using WiFi: Press ESC on keyboard -> navigate to Scripts -> select WiFi -> connect to your local SSID.
3. If using Ethernet: Wait for the network IP address icon to display at top right.
4. Press ESC -> go to Scripts -> run update_all.
5. The script automatically fetches core binaries, system OS files, arcade ROM dependencies, and layout assets.
Controller Configuration
- Press ESC to open the main menu.
- Select Define Controller Buttons.
- Map your D-Pad, face buttons, and set a Menu Combo (e.g., Start + Select) to toggle the MiSTer menu without a keyboard.
- Arcade Cores: Each arcade game allows independent button mapping directly within its on-screen OSD menu.
4. Advanced Options & Ecosystem
- Analog Video: MiSTer supports CRT TVs, PVMs, and arcade monitors via the Analog I/O board or Direct Video HDMI-to-VGA adapters (Component, S-Video, Composite, RGB SCART).
- Fast USB Polling: Enable fast USB polling in settings/scripts for ultra-low latency sub-millisecond controller response.
- Support Open Source Developers: Core developers maintain Patreon pages for ongoing FPGA reverse-engineering efforts.